2: NiceGUI Weather App: Layout and Styling
- Ashish Disawal

- Oct 21, 2024
- 3 min read

Introduction:
Now that we’ve got the basic setup of our NiceGUI project in place, it’s time to build the foundation of our weather app. In this post, we’ll create the layout and add some static placeholders that will later display weather information. We’ll also enhance the look and feel by adding some basic styling.
Lets get started with layout and styling of our app.
Step 1: Setting Up the Layout and Styling base
The weather app will need a few key components:
An input field where users can enter their location.
A section to display weather data.
Buttons to fetch the weather and save favorite locations.
We’ll use NiceGUI’s built-in components to create these elements.
Update main.py to add the layout:
In this layout:
We have a label for the weather app title.
An input field where users can type a location.
A placeholder button for fetching weather data.
A static label for where the weather information will be displayed (to be replaced later with dynamic content).
Step 2: Adding CSS for Basic Styling
NiceGUI allows you to style components with built-in utility classes (similar to Tailwind CSS). You can add custom styles by either applying classes or inline styles.
Add custom styles for basic formatting:
The app title has a larger font size.
Input fields and buttons are centered and properly spaced.
Weather information is displayed in a readable, attractive format.
Example of style adjustments:
This adds a larger font size (text-4xl), bold text (font-bold), and margin below the title (mb-4).
Applying responsive layout using NiceGUI’s row and column containers:
Use .row() to align elements horizontally.
Use .column() to stack elements vertically.
Add classes like justify-center and items-center for centering.
Step 3: Formatting Placeholders
Now let’s add placeholders where we’ll display weather data. For now, we’ll use static labels as placeholders, which will later be updated with actual weather data.
Create weather data placeholders:
Replace the above code with this
In this code:
We create a vertical column using ui.column().
Each label acts as a placeholder for temperature, humidity, and wind speed.
The data will eventually be updated dynamically from the weather API.
Step 4: Enhancing the User Experience
We’ll add a few more enhancements to improve the user interface.
Styling the input field and button:
We can modify the look and feel of the input field and button by using the following classes:
props('clearable'): Adds a “clear” button to the input field.
ui.button() can have classes like primary, rounded, or large.
Adding a custom theme (optional):
If you want to take the styling further, you can customize the theme by either applying CSS or using NiceGUI’s theming options.
For example:
This adds a custom color to the title (#3498db is a shade of blue).
Step 5: Wrapping Up
At this point, we’ve built a skeleton layout for our weather app. We’ve used NiceGUI components to create the input field, buttons, and placeholders for weather data. We’ve also added some basic styling to make the page look more presentable.
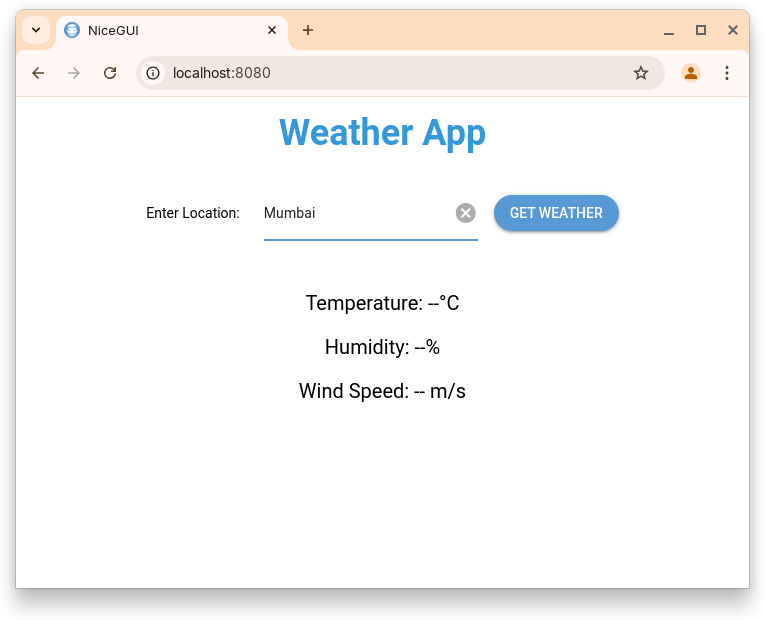
Here’s how the final layout looks:
The page has a clean, centered structure.
The input field and button are ready for interaction.
Static placeholders show where the weather data will be displayed.
In the next post, we’ll integrate the OpenWeatherMap API to fetch real-time weather data and display it in place of these placeholders.
Final Code for main.py:
Conclusion:
In this post, we’ve covered how to set up the layout and placeholders for our NiceGUI weather app. You should now have a clean, static interface ready for the next step: connecting the weather API and displaying real-time data.
In the next post, we’ll integrate the OpenWeatherMap API and dynamically update the page with actual weather information!


Comentarios